“Making It” in the Language Classroom: A Look at 3D Modeling with Luma AI
By Elizabeth Enkin, University of Nebraska-Lincoln

DOI: https://www.doi.org/10.69732/NYPH3901
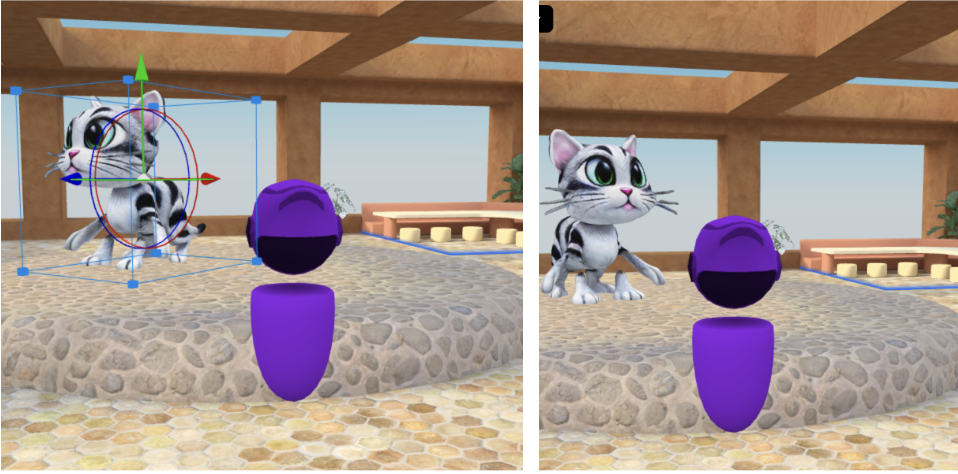
My journey with emerging technology began in our language lab at the University of Nebraska-Lincoln in 2018, when we first began looking at how the lab could provide nontraditional language learning opportunities to students through the use of immersive virtual reality (VR). We documented our projects in several publications, including in a book chapter in IALLT’s Language Center Handbook 2021. Some of our important findings centered around VR’s ability to successfully facilitate experiential learning and creative expression, in terms of both students’ communication in 3D spaces and making 3D models for cultural learning. 3D models are visual three-dimensional digital representations of objects that are made using software. Creating 3D models provide a new and engaging way for students to contextualize cultural concepts, but it can also facilitate the freedom to create (and talk about) artwork that is both meaningful to them and aligned with curricular objectives. 3D models can be imported into various apps, where they can be moved around and worked into a larger project; they also pair naturally with 3D spaces, as students can import, move, and discuss them while being in those types of environments (see an animated GIF below of a 3D model being moved around after it was imported into a 3D space).

The idea of working with 3D models may therefore interest language educators, and can lead to projects centering around various topics (such as art) and activities (such as storytelling). However, a potential drawback is the steep learning curve that 3D modeling software often requires. Read on to discover how generative AI can step in to help!
What is Luma AI?
Luma AI was created by the startup company LumaLabs. It is an AI software that combines the fields of 3D modeling with AI, and is available on the web (through Luma AI’s website) or as an iPhone app. With this generative AI tool, users can create any 3D image or video through captured images. In 2023, the company launched their newest product called Genie, which allows users to generate 3D models from text prompts. Genie is free to use, and because it is currently in beta, there is no limit to how many 3D models you can generate. Below is a table summarizing the main information about this tool:
| Name of tool | Luma AI (Genie tool) |
| URL | https://lumalabs.ai/genie?view=create |
| Primary purpose/use of tool | Create AI-generated 3D models based on text prompts. Text prompts provide a description of the model that users would like to generate. Once users hit “create,” they will receive four AI-generated variations of the model, with the option to also “retry” for more variations. |
| Cost | Free |
| Ease of use | Simple and easy to generate 3D models by creating a free account and logging in using Apple, Google, or Discord. |
As of January 2024, Luma AI’s website also notes that the following languages can be used in Genie: English, Spanish, Portuguese, Portuguese (Brazil), Simplified Chinese, Traditional Chinese, Japanese, Korean, Dutch, and Vietnamese. However, I have personally tried inputting German and French into Genie as well, and it does produce accurate 3D models, though it currently does not appear to work with the Cyrillic alphabet (e.g., Russian, Ukrainian, Bulgarian). Educators should therefore check to see if their language is supported. Conveniently, all generated models are free to use for commercial and non-commercial purposes, with attribution to Luma AI.
An alternative to Luma AI, is Meshy AI, which also supports multiple languages as input (though there is a limited amount of free 3D models that can be created per user; with the free version, each user has 200 credits per month, and each generation of a prompt costs 5 credits).
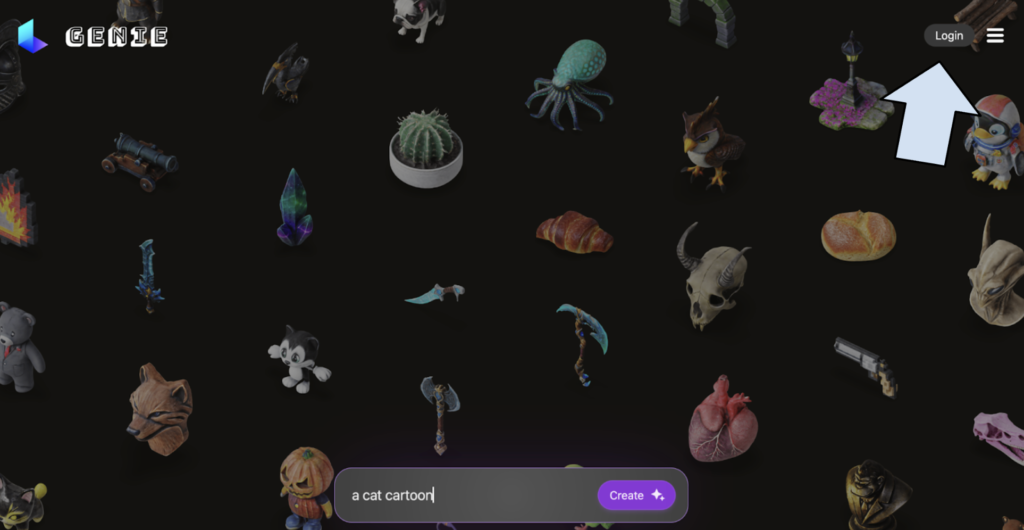
Genie is a web-based tool and requires an account to log in and get started. From the homepage, users must therefore first choose to “Login” with either Apple, Google, or Discord (creating an account for any of these is free, and instructors can choose what is best for their students). After you have signed in, you can begin generating any 3D model using text as input. This can create various options for educators when it comes to lesson planning.
How do I use Luma AI’s Genie tool?
After logging in, students will find themselves on the main page again, on the “Imagine” tab, and are ready to create. There is also a “Creations” tab where students’ 3D models will be placed.
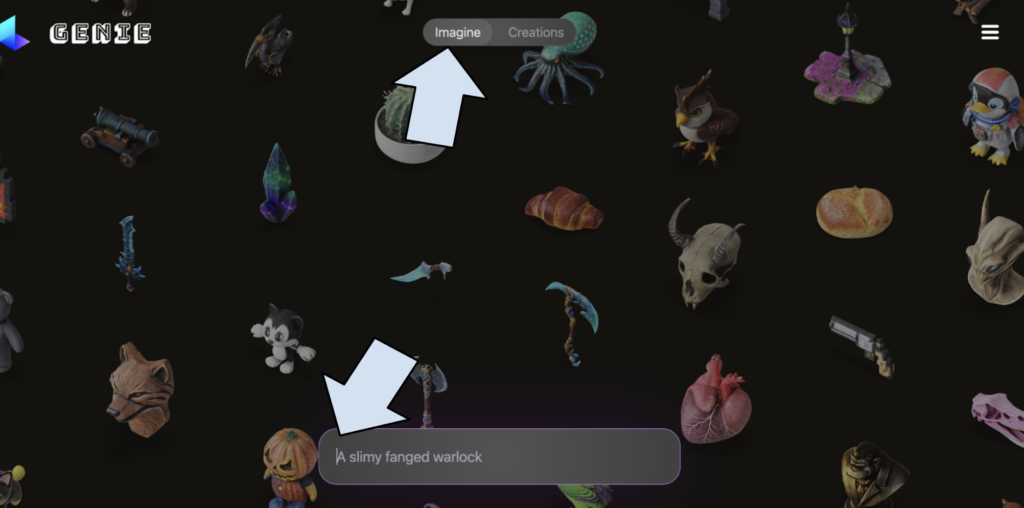
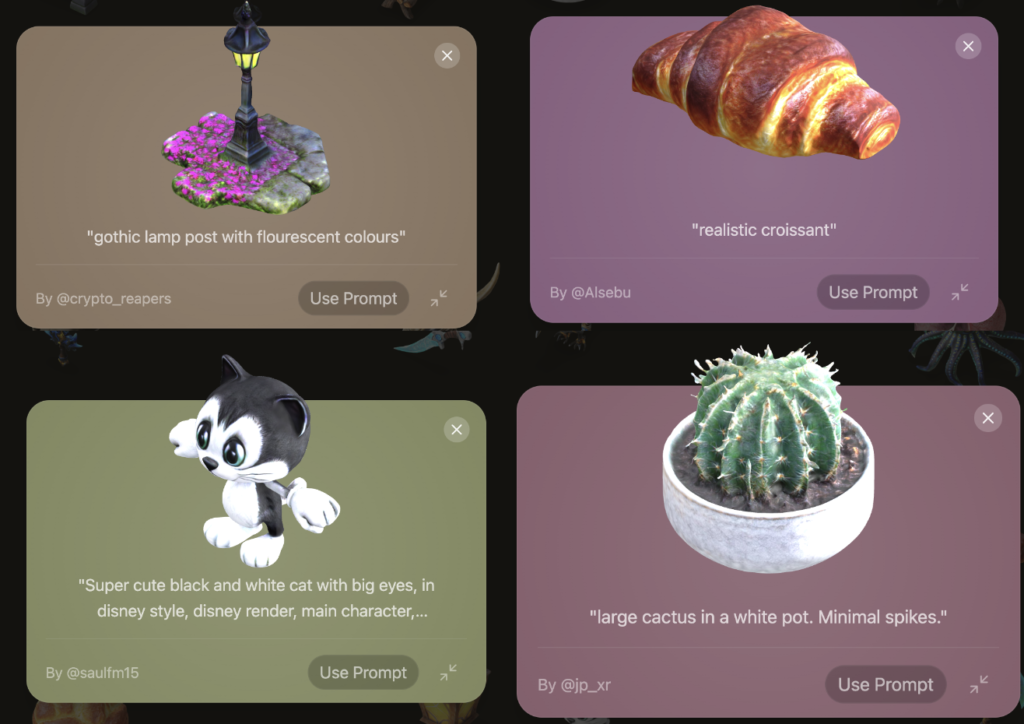
On the “Imagine” tab, students can type in any prompt they would like in the target language. Sample prompts (in English) are provided, and students can also click on any of the 3D models on display to see (or reuse) the prompt that was used to create it. Some examples of these are pictured below:
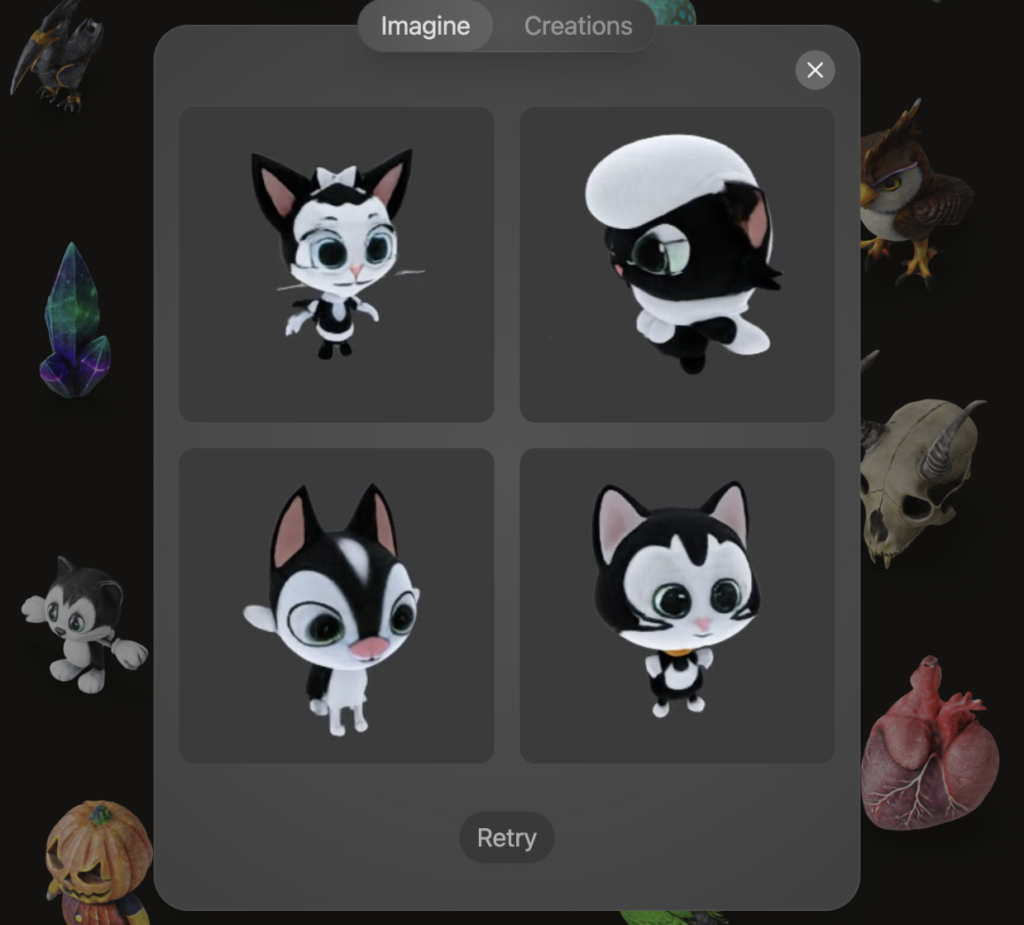
Once students create a prompt, there are four variations of the model that are generated, as seen below. Users also have the option to click “Retry” should they want another four variations to be generated.
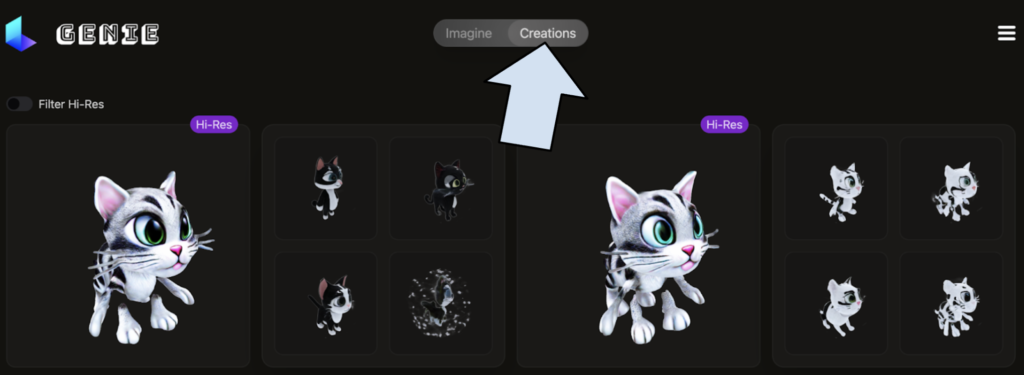
Students can find all of their generated models by clicking on the “Creations” tab up top. From there, learners can click on any model to download it.
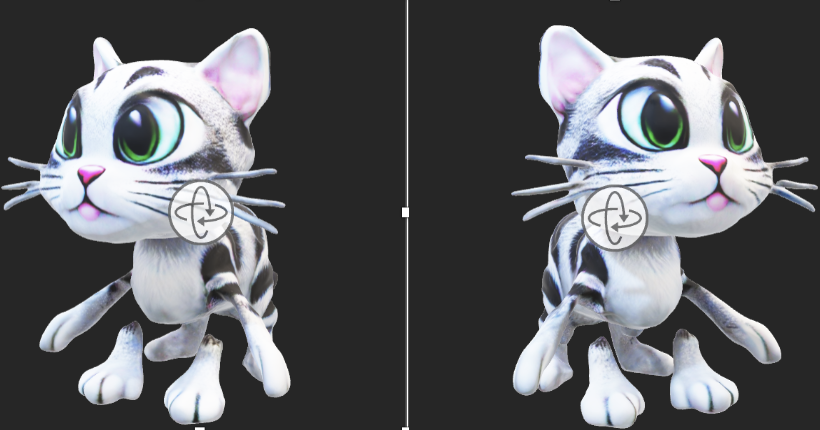
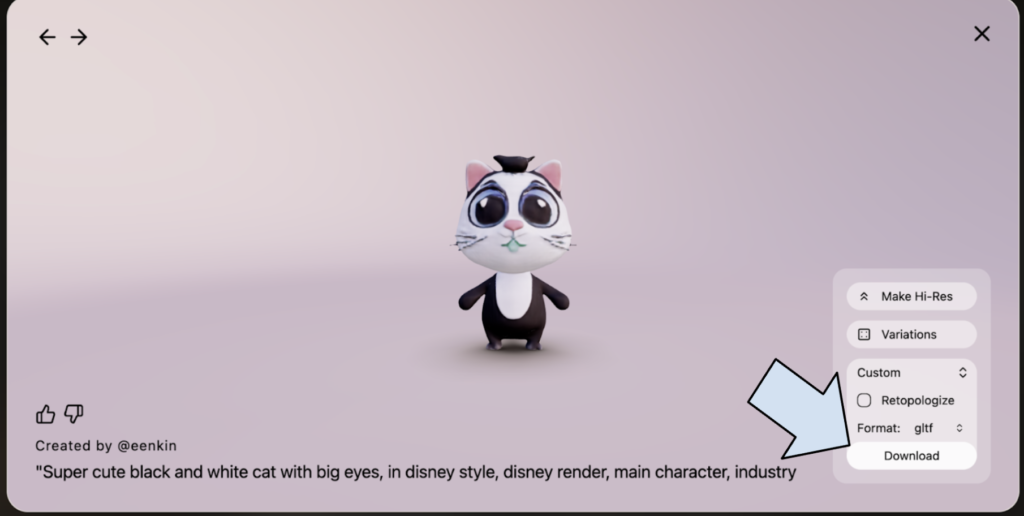
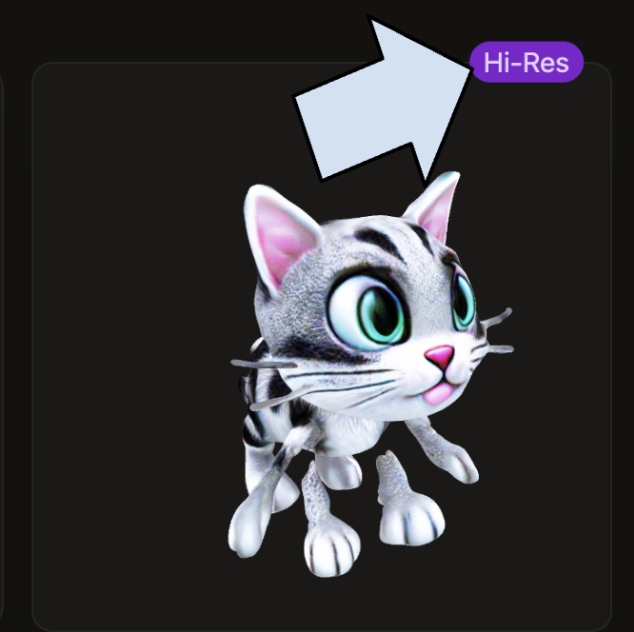
The model will then pop up for the user, and there are several options presented (see picture below). There are options to make the model high resolution (Hi-Res) – (see an example of this below), and to create further variations of the model. The file size can also be adjusted and users can choose to prepare the model for a specific application under “Custom” (though for both of these, the default settings work well). Finally, students can click “Download” to download their model. There are various formats to choose from, with gltf being the most ubiquitous file extension to select for 3D models (it will download the model as a .glb file).
Once the model is successfully downloaded, it can be imported into various apps that allow importation of 3D models (as .glb files), such as MS Word or PowerPoint, Book Creator (with a premium subscription), or a VR metaverse (a 3D space) such as Frame VR (this is an example of a web-based metaverse, which can be used in desktop and immersive VR, and has a free account option). Because these are 3D models, they can also be rotated 360°, as shown below (top two pictures show the model in an MS Word document and the bottom two show the same model in a Frame VR scene, or “frame”).
How Could I Use This Tool in the Language Classroom?
The Genie tool could be useful for project-based learning, specifically for reinforcing vocabulary items. In particular, it can be most effective for learning and practicing nouns and adjectives, as you do not need to write in complete sentences to generate models, nor do you need to use accurate grammar. Below is one such idea.
Provide an Introduction: Playing with Prompts
To begin, students should become acclimated to working with text prompts. This has the benefit of introducing the project to learners while also allowing them to explore the target language in a new and stress-free way.
In small groups, students can first try out various prompts in the target language by translating some of the sample prompts and seeing what Genie generates. In this way, they can also become familiar with the different terms that could be used to create specific styles of models (these can be seen within the sample prompts provided on the website, with adjectives that can be translated into the target language, such as “realistic” or “Disney style”). Together, students could then generate a short list of vocabulary that they learned through this exercise. Their lists could be shared with the class as well.
Contextualize Your Project: Thinking of a Theme
After an introduction, you can continue on with your project, which should be framed around a theme/topic. Read on for some ideas.
One example for a beginner-level classroom would be to create a project around topics generally covered in first-year textbooks, such as physical descriptions, food, weather, or clothing. For example, students could be asked to create a booklet of a wardrobe for their friend for the different seasons in a specific location. Or, students could create a menu of items for a specific restaurant in a certain location. In this way, cultural perspectives and products can also be brought into the lesson and into 3D model generation. With this said, one caveat to note is that Genie does not produce genuine “authentic materials” for language learning as we understand them, but what it does create is a parallel experience that opens students to cultural learning in a nontraditional and experiential way.
For intermediate and more advanced learners, students can work in small groups (or individually) to create an entire story for their models in the target language. This would work to bring in more grammar practice and additional vocabulary into the project. In Spanish for example, this type of activity could work to practice the preterit vs. imperfect past and any related vocabulary. If working in groups, each student in the group could be responsible for creating several models for the story (which would serve as illustrations), and could then present their projects at the end. Groups can also decide how to best utilize their 3D models/illustrations, choosing for example to have everyone take on a specific character from the story. At the end, students could vote on the group who created the most “accurate” models for their story (i.e., the ones that completed the assignment the best), in their opinion. Additional categories could also be created, such as the most creative or comical story.
Another, natural way to use 3D models is for an arts-based unit, and for students to create an “art exhibit” in groups (or individually). Students could describe (orally or through writing) the exhibit and each model in it, the connection to the art theme, and what each piece represents or contributes to the exhibit. This would once again be an excellent way to incorporate cultural products (artifacts) into a lesson with the use of Genie, and could be usable for various proficiency levels as well.
Take it a Step Further: “Making it” in the Metaverse
Taking the idea of an art exhibit a step further, one could also combine other emerging technology with this project. For example, groups (or individuals) could ultimately create a 3D scene/art gallery using a web-based metaverse (such as Frame VR, which is also similar to Mozilla Hubs, a platform that has also been widely used by educators). There, students can import, place, and display their models for everyone to see. Students can choose from multiple different scenes, and their peers could be invited to visit their gallery on their own time (via a shared link).
Because these types of metaverses enable voice chat (like traditional web conferencing platforms), students can also go into these virtual rooms in pairs or small groups, and talk while they are looking at the models (in the target language, or a mix). A vote like the one described above can be utilized as well (for the most creative project, etc.). Indeed, incorporating a metaverse in this way would be another avenue for students to express themselves creatively, and can be an enjoyable closure to this type of project. It may also provide some additional motivation for students to be creative, and they could get in some additional communication practice.
Conclusion
We know that visual aids and authentic resources have long assisted our language students in their creative expression and cultural learning; now with generative AI, students do not need to learn complex software to express themselves in a nontraditional and new way in the target language and culture! The Genie tool by Luma AI is one such app that can facilitate these types of projects (though others that have a similar interface/functionality are available as well). Interestingly, these types of projects can have additional extensions too, such as actually printing the 3D models with a 3D printer, or generating models of characters that are in the “T-pose” and then importing them into a 3D animation software, such as Mixamo. Please feel free to try out the Genie tool for your next project-based activity, and be sure to share your thoughts and creative ideas in the comments.
Further Reading
Enkin, E., & Kirschling, E. (2021). The smart language lab: Building and integrating emerging technology into language programs. In E. Lavolette & A. Kraemer (Eds.), Language center handbook 2021 (pp. 313–340). Auburn, AL: International Association for Language Learning Technology.