Miro: the Visual Collaboration Platform You Need In Your Online Classroom
By Ekaterina Shutenko, Fulbright Teaching Fellow in Russian, Lehigh University
DOI: https://www.doi.org/10.69732/XHPL3800

The Miro team claims their product to be a visual collaboration platform: not just another online whiteboard, but rather an interactive tool that allows you to create, collaborate, share, and present. Suppose you were in a real physical classroom with all your worksheets, books, cards, markers, video screening, and slides but now all in one digital, rather than physical space. Sounds too good to believe? Let us see what the platform actually has to offer to a language teacher.
| Name | Miro |
| URL | https://www.miro.com/ |
| Primary purpose | Online collaborative whiteboard platform |
| Cost | Free Plan (limited) | Free Education Plan (available through application) |
| Ease of use | 5/5 | Easy and mostly intuitive to use |
Miro, formerly known as RealtimeBoard, and named after the Spanish artist, is a rebranded interactive tool for team collaboration used by such innovative companies as Netflix, Cisco, Skyscanner with around 5 million users globally. Originally created as a tool for project management and team collaboration, the platform boasts creativity, experimentation, and flexibility, and provides almost endless opportunities for implementation in an online language classroom.
As more language classes are moving online, we need ways for language teachers and students to collaborate digitally. Miro allows teachers to present material while students can be interacting and contributing in the same shared space. It is a perfect platform for language practice as students can work together to write dialogues and texts, make stories or videos. Miro can be used to play board games virtually or even submit homework assignments and receive detailed feedback.
Starting Your Work with Miro
You can use a web-based version of Miro or download an application on your Android/iOS device. Once you are on the website or in the app you will be prompted to create an account by providing your email or via your Facebook/Google profile. I would recommend that you sign up with your institutional email to further be able to apply for a free Education Plan (which includes up to 100 users). Students can apply for the Education Plan as well, which allows them to collaborate with up to 10 users for 2 years.
Even though the free plan will still do, it is quite limited with only three editable boards available and no option for unregistered guest editors (if you want to run an activity without making your students sign into their Miro accounts, they will only be able to view the board). The Education Plan allows you to create an unlimited number of editable boards, and grants you access to several helpful tools like a timer, voting, and custom templates. In your Education Plan account, you will be able to organize all the boards into projects which make work with multiple boards more structured. Some of the features accessible through paid team/enterprise accounts are non-existent on either free or education plans, e.g. video chat, integration with project management tools. However, those features seem to be more essential for businesses and may not justify applying for a paid account. If you are interested in a paid account, check Miro’s pricing plan page.
Once your account is set you will be able to create your first board by choosing a template or picking the blank board option which you can fill with any content you need. Unless you intend to focus on brainstorming, creating a mind map, or working on any other specific activity during your online session, it is advisable to choose the blank board option, as the templates are still available to you after you get into your particular whiteboard.
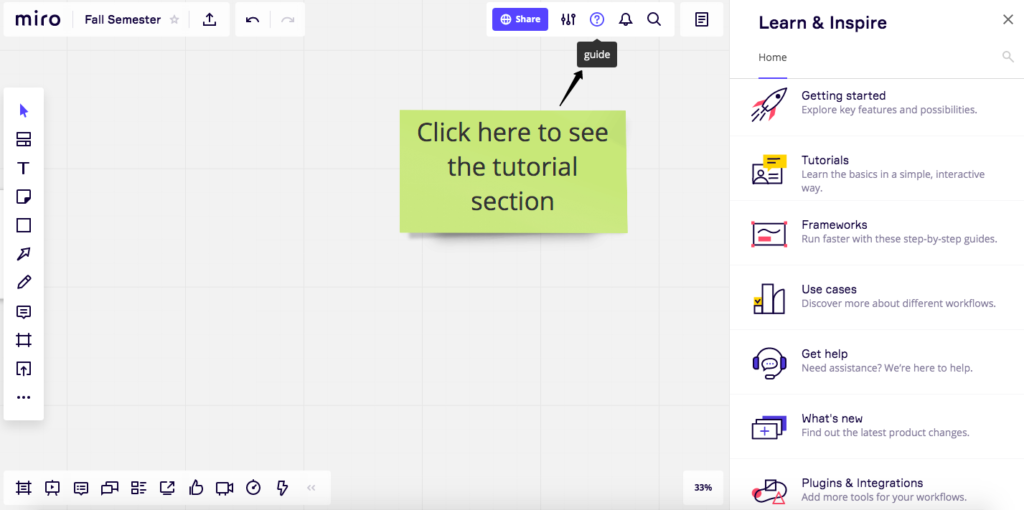
In your newly created board, I would suggest you refer to the guide in the top right-hand corner. The guide provides you with short video tutorials and interactive prompts which will give you an idea of the main features of the platform.
Main Features of a Miro Interactive Board
By clicking on the top left of the workspace you can title your board and edit the board settings. Use the tools on the left-side panel to fill your canvas with the content. Most of the tools are quite intuitive and allow you to add into the working space almost anything you can think of from text, simple shapes, and sticky notes to images, documents, grids, and videos. Through the Add apps feature you can easily integrate the board with Google Drive/OneDrive or Box/Dropbox and embed your documents into the board. Thus, you will be able to edit your document right from the board with all the changes automatically saved into your cloud storage. Add apps feature also enables you to add more tools to your left-side toolbar by simply dragging them there.
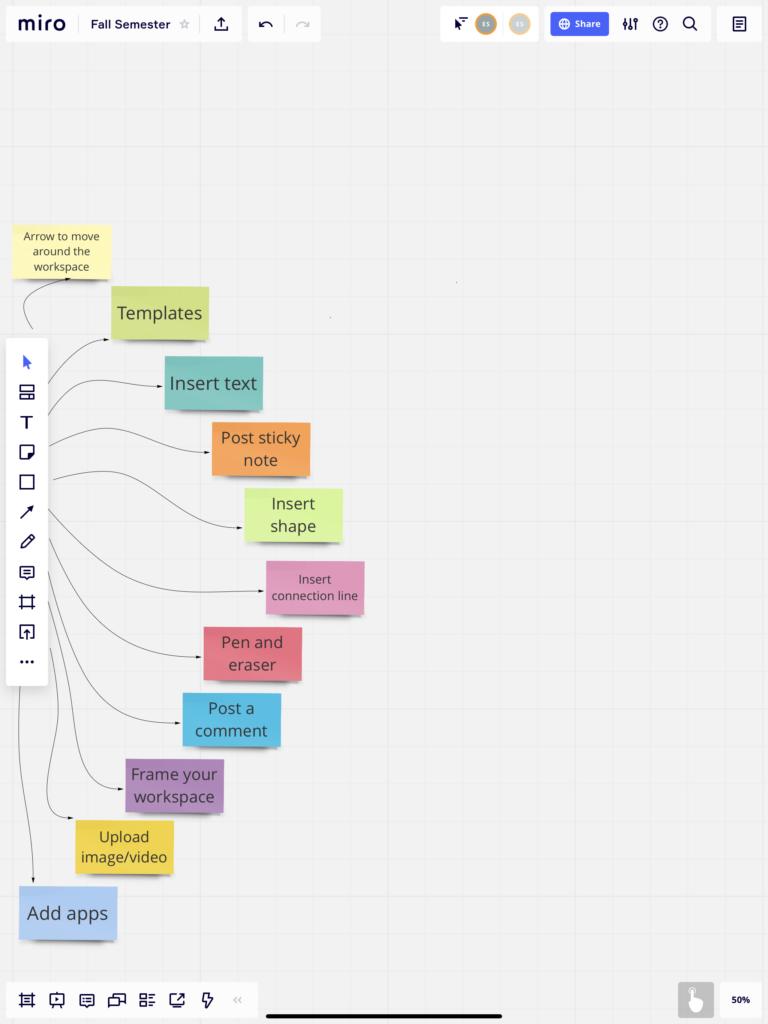
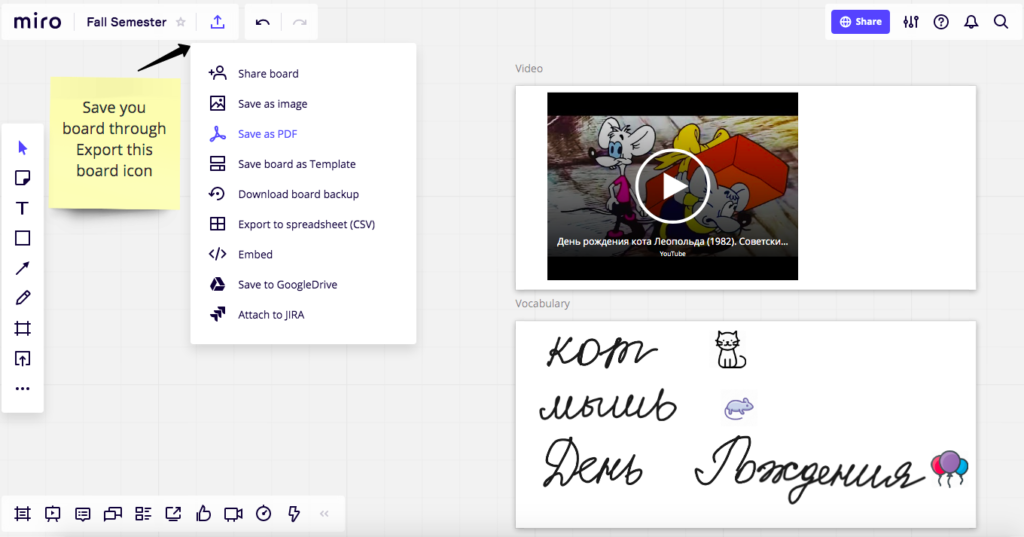
Another tool placed on the left-side panel which is particularly useful in a teaching setting is Frame. It helps you organize your workspace into sections and allows you to save all the frames as a part of a pdf document. You can save the document through Export this board icon on the top left of the canvas. There are various formats as to how you want to save the board. I find PDF the most convenient option since you can post the document on your LMS for your students to refer to after the online session.
While the tools on the left-side panel serve to create the content, the tools on the bottom left are mostly used to present and collaborate. Such tools as Chat, Voting, and Timer can be particularly helpful to manage group work and collaboration during synchronous sessions. Comments and Cards (which are basically advanced comments allowing you to add tags, assign people, set deadlines and insert links inside the field of the card) might be essential to communicate feedback and arrange student interaction in an asynchronous mode of work.
When you finish organizing all the content on the board, you can share it with your students through the Share icon on the top right. Invite your students to collaborate through their email or use a public access option if you want the students to work anonymously (e.g. leave anonymous feedback in a shared space). If you want to keep track of your students’ work, invite them via their email and they will be prompted to create a free account that allows them to collaborate in any boards you share with them and create three boards of their own. Encourage your students to apply for the free Education Plan with unlimited boards and advanced editing features. In case you teach multiple groups, divide them by Projects, and add the students of each group to a specific project. All the boards you create under one project will be available to all the students in a specific group.

Application of the Miro Interactive Board in the Language Classroom
With all the features described above, the application of Miro in an online teaching setting is limited only by your imagination. In synchronous mode, Miro is a powerful tool for presentation of new material. You can upload videos, grids, images into your board before the synchronous session and during the session easily interact with the material adding any drawings, handwritten comments, or anything else you might need from the toolbar features. If you are planning on merely presenting the material, you can just share your screen without asking the students to access the board. If you want students to collaborate, you will ask them to sign in, so you will immediately see their initials in the top right corner, and when they are performing any actions you will see the cursor with their name next to it moving over the canvas.
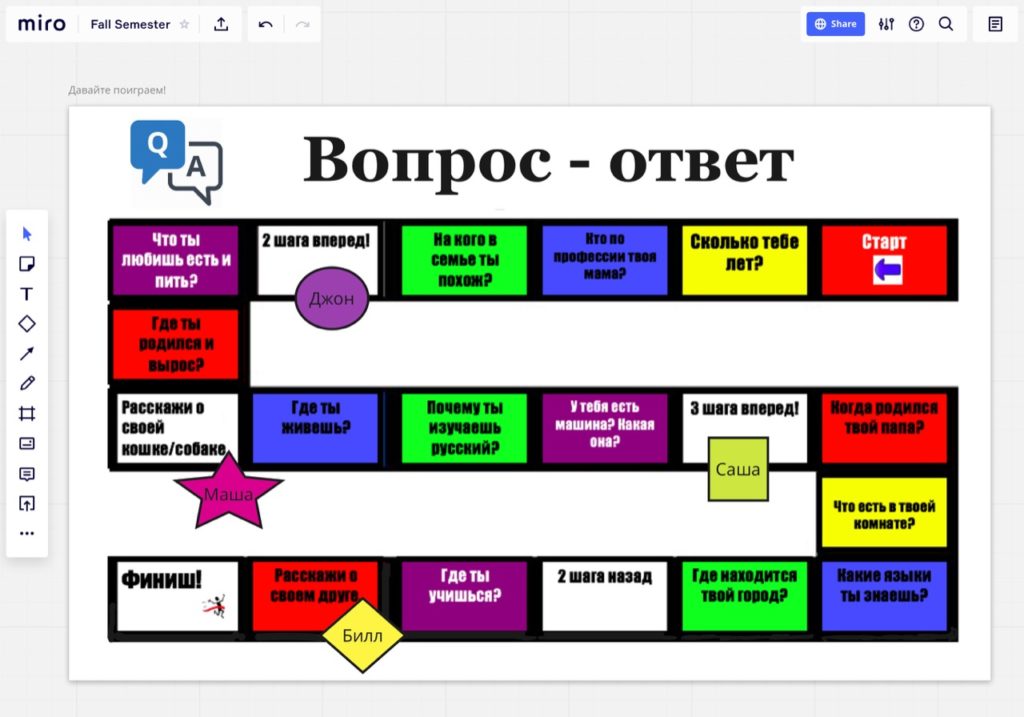
When you proceed to the practice portion of your lesson, Miro will help you organize pair and group work easily and effectively. You can use different board templates to allow your students to work on different language areas (e.g. using mind map templates for vocabulary review). It is easy to convert the Miro working space into the playing field of any board game. You will only need to paste your favorite board game in .jpg or .pdf format and have your students create their own tokens from shape options and move them around the field. Virtual dice will help you make the board game experience as close to the physical classroom as possible.
If you want students to produce some content during the synchronous session (write a dialogue, a story, etc.), create several frames inside your shared board, divide the students into groups and let them work in their own working space. They will be able to see each other’s progress in real time which is likely to make the assignments even more competitive and engaging. Working in the same shared space brings the online experience closer to the real classroom where students normally can hear and see what others do. I believe this feature of Miro adds a feeling of belonging to the group which is sometimes missing in an online learning setting.
In addition to working on assignments and activities in synchronous mode, students can use the board to work on group projects in asynchronous mode. They will have to create their own group board and share it with you. Miro provides the students with plenty of tools to plan and coordinate work while it grants you several options for giving timely feedback. In Miro, students can create visual stories, write texts, make presentations, or upload videos. With many great tools, Miro offers students space to practice the target language while creating meaningful content.
Apart from asynchronous collaboration, Miro can be used for individual work as well. The board can be converted into an individual digital workbook where every frame is a new assignment. Students create their own personal boards and share them with their teacher. For every assignment, they add a frame, name it with the date or title of the assignment, and add text, pictures, videos, or write in the frame using the stylus. Students can upload pictures of the texts they write in their regular notebook, or if they have access to a touchscreen and stylus, they can practice their handwriting right in the Miro working space, which is particularly useful when teaching a language that uses an alphabet other than the Roman alphabet. Students can also upload videos of oral assignments into the board. Comment and Cards tools make giving feedback simple, and since the student is going to use the same working space for the whole semester, you can encourage them to respond to your feedback and edit the assignments using prompts and recommendations you leave on a board.
To sum it up, Miro is a great interactive platform which not only makes digital collaboration easy but also provides a number of instruments for individual creative work. It integrates presentation features of a regular online whiteboard (like Jamboard or the Zoom built-in whiteboard) with more advanced features of visual content production and team collaboration. An abundant toolkit, free access, and intuitive interface make Miro a great instrument for engaging and effective online instruction.
Miro is a beneficial tool for virtual language teaching. It is an amazing instrument for developing meaningful engaging activities.
Mind blowing blog post.
I was looking for the exact information about this concept. It boosted my knowledge and I am happy to read your article. Do post more content regarding this topic. Thank you.
Dear Margot, thank you for your comment and the questions. Miro is indeed a great tool and definitely more intuitive than it might feel after you have read my article. I suggest you just create a free account and play with the features yourself to see how simple and user-friendly everything is on this platform. As for the student collaboration, you can still use an unpaid account, you will just have to ask your students to create free accounts as well and sign in to be able to collaborate. Education plan (which is free but requires application form) allows your students to collaborate without the need to sign in if you make your board public.
The board games are something I make myself for my classes but depending on the language you teach you will be able to find free worksheets on different platforms where teachers share their materials. https://islcollective.com/ is one of those.
I hope I was able to answer your questions!
Hi Dr. Shutenko, and thanks for the informative article. This looks like a great tool, though I admit that I felt overwhelmed by the end of the article. I have three questions. First, it sounds like so much work to put together a synchronous lesson of new material–is it more intuitive than it feels at this moment? Also, when you’re teaching new material and then have students collaborate, is it better to have a paid subscription? Finally, and forgive my ignorance here–but where do you find .pdfs of board games? Thank you! ~Margot