
Mission Possible: Organizing Your Book Collection With LibraryThing
 By Lisa Katzenstein, Tutor Coordinator-Language Corner, Richland College, Dallas, TX.
DOI: https://www.doi.org/10.69732/CDOE7210
This is the story of a collection of 500+ books scattered around the language lab at Richland College in Dallas, Texas and how I organized the collection using an online platform called LibraryThing. I already had a handful of my personal books on this wonderful online catalog, but knew that some small libraries were using it as well. Our new catalog provides ease of access for students and instructors in our School of World Languages and Cultures and provides a much better way for us to track usage at a minimal cost. Organizational accounts in LibraryThing are $10.00 a year or $25.00 for a lifetime membership. You can also upgrade your online catalog through the addition of TinyCat for $3-$35 per month depending on the size of your collection and the number of staff at your center.
Creating an Account
The language lab supervisor, who had no previous experience with cataloging software, easily set up the Language Center Learning Resources Collection (LCLRC) account for the language lab staff. All that was required was to provide a name, password, and email to set up the account (Figure 1):
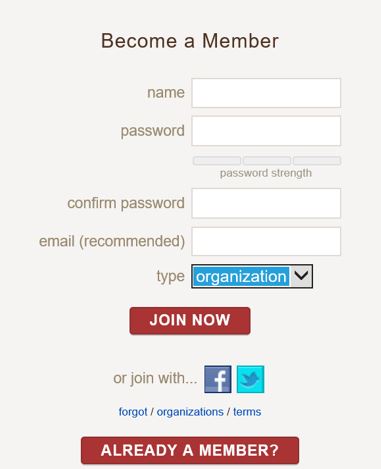
When you are creating a new LibraryThing account, you will receive an e-mail, which will provide you a link to your online catalog and your profile. It also has a number of helpful links to assist you, such as how to add books to your collection online, get the mobile app, and edit your profile, as well as a link to a short introduction to LibraryThing.
Adding Books to the Collection
To add a book to LibraryThing, you must be logged in with a username and password. Once you are logged in, you will click on “Add Books” in the brown menu bar at the top of the screen (see figure 2) Although you can search for the item you wish to add by its name or author, the best way is to search by ISBN, the 10 or 13 digit number you will find on the book’s cover or on the back of the title page. As each ISBN is unique, you know that you are getting the correct edition of a book if you use the ISBN to generate the book record.
Enter the ISBN in the first search box and then choose a database to search under “Search Where?” We chose to search the Library of Congress to get a Library of Congress classification number to help in organizing the collection. However, if you cannot find the book with that option, you will need to search the “Amazon.com” option, which will most likely find the book but will not give you the Library of Congress classification number.
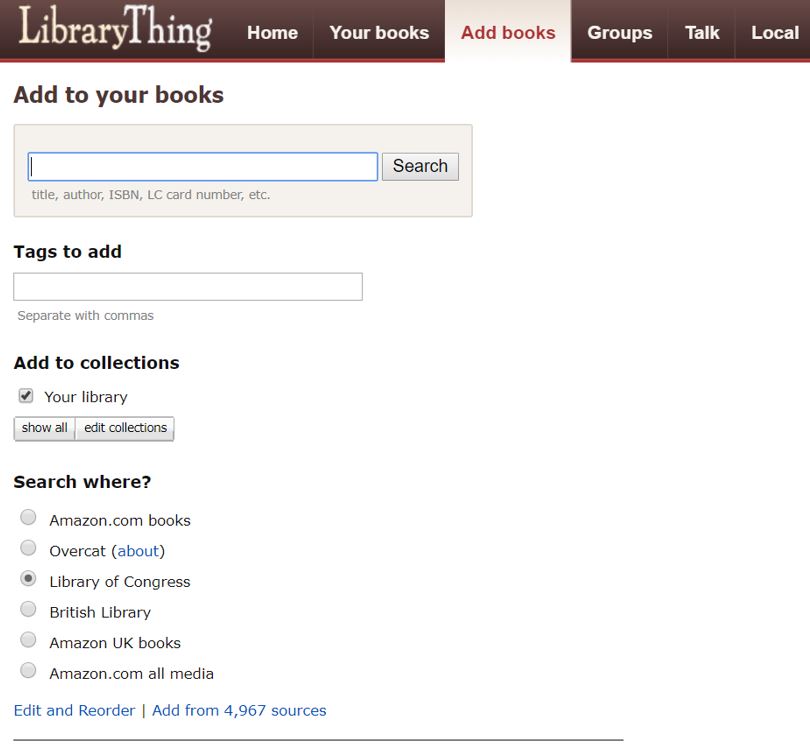
You will need to look those up those Library of Congress classification numbers on a database like WorldCat (https:/www.worldcat.org), where you can see what other catalogers around the country have used for the book that you are adding to your collection.
I do not use official Library of Congress subject headings, which are sometimes lengthy and cumbersome. I have instead created a list of tags that I consistently use to describe my books. For example, if I have an ESOL book on writing, I put the word “writing” into the “Tags” field. If I have a Spanish textbook, I simply put the words “Spanish language” into the Tags field. Except for the “Tags” (for subject headings) and sometimes the “LC Classification Number” field, all of the rest is automatically generated by LibraryThing when you enter an ISBN. If you have a large number of books to import, you can also import them as a CSV (Excel) file rather than entering them one at a time.
Customizing Your Public Catalog
You have the power in LibraryThing to select which fields of information are displayed to the public. Click on “Your Books” at the top of the screen. Find and click on the “settings” button, also at the top of the screen, and you will see the following information (Figure 3):
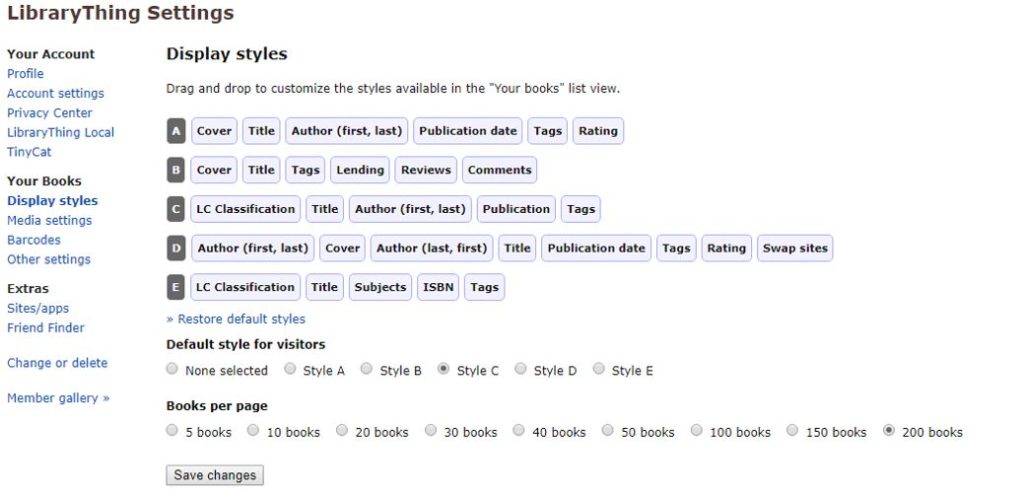
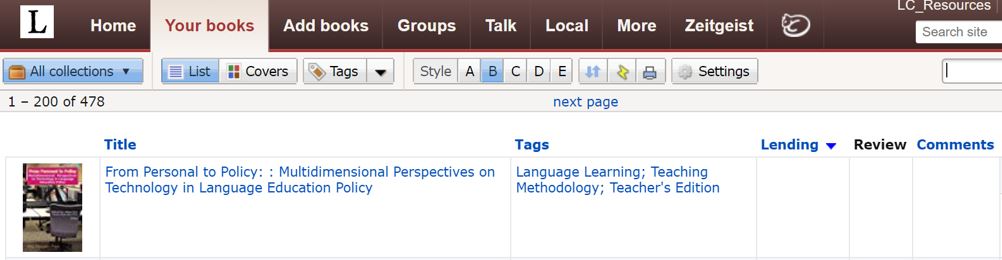
We have picked Style C as the “Default style for visitors” for our collection. LibraryThing will display the Library of Congress Classification number, the title of the book, the author of the book, the publication information, and the “Tags” field. Please note that LibraryThing also allows you to choose the number of books per page that can be displayed. We have selected 200 books, the maximum allowable limit. It is totally up to you what you want your library users to see. You can view our online catalog display here. Other fields that you might wish to display include:
- “Entry date” (the date that the book was added to the collection),
- “Ratings” (where you can rate a book from 1 to 5 stars),
- “Cover” (a picture of the book’s cover),
- “Reviews” (where you can type in short comments about the book),
- “ISBN” (International Standard Book Number),
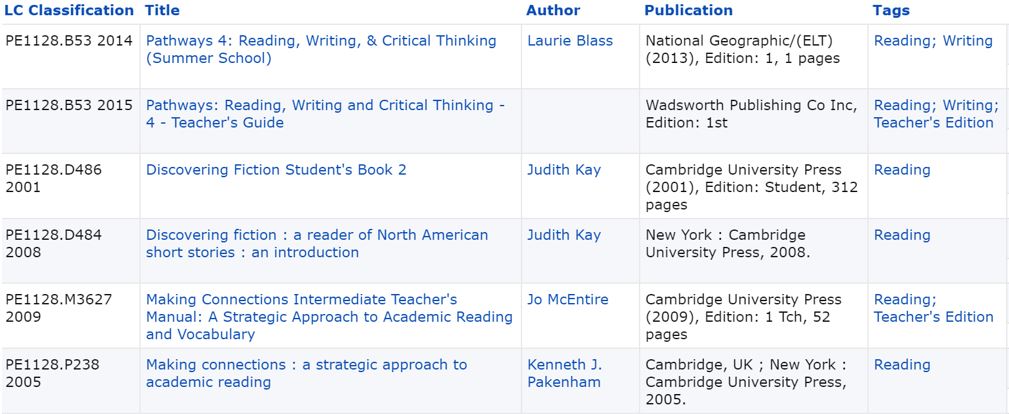
Below (Figure 4) is an example of some of what you might see when you use the online catalog on LibraryThing.
Searching the Public Catalog
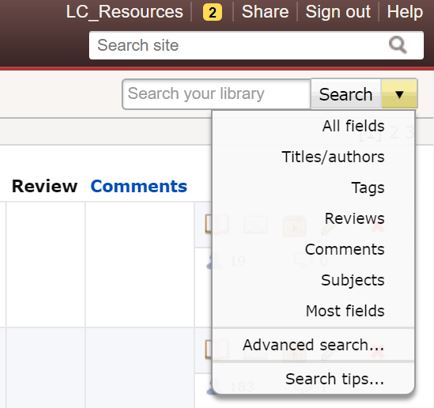
To search for a book on LibraryThing, go to the search box at the top of the screen. You can search by “All fields,” “Titles/authors,” “Tags,” “Reviews,” “Comments,” “Subjects,” and “Most fields” using the pull-down menu. (Figure 5)
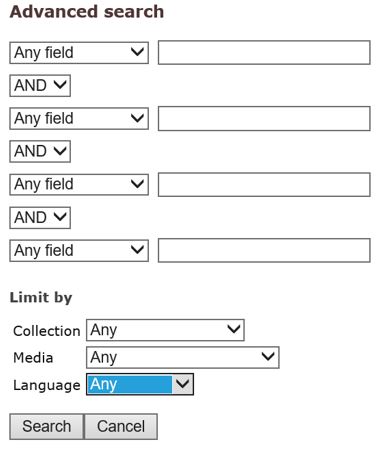
If you click on “Advanced Search,” (see below) you will see the following screen with drop-down search options, which include “Publication,” “Source,” “Publication Date,” and “ISBN.” You can also limit by the type of collection (“Your library” is the best one), media format (paperback, hardcover, DVD, etc.) or language. (Figure 6)
I encourage you to explore our online catalog to get a true sense of how LibraryThing works for patrons.
Checking Items In and Out
To check out a book to a user, click on “Your Books” at the top of the screen. Then double click inside the lending box for the book you wish to check out. (Figure 7)
You will then see the screen below (Figure 8):
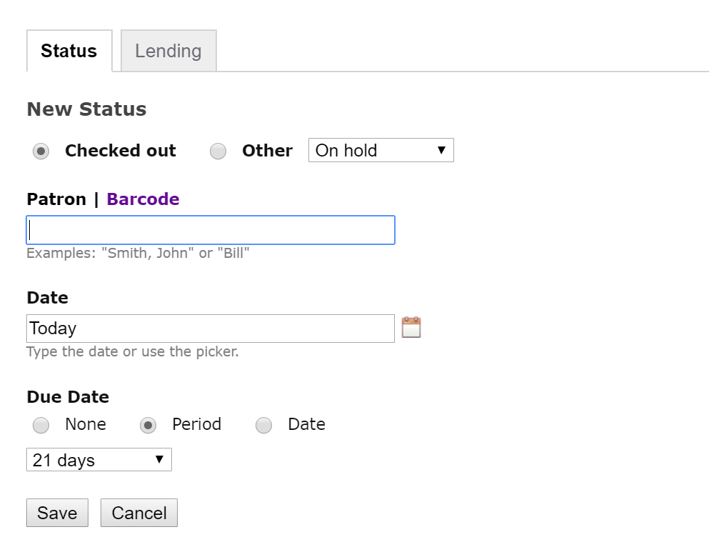
To check out a book, the “Checked out” radio button needs to be selected. Enter the name of the library user in the “Patron / Barcode” box. If it is a new patron, a message will appear: “Patron does not exist. Create?” On subsequent checkouts, you will be provided with a list of existing patrons matching your entry. Within LibraryThing this is the only way to register library users. The TinyCat upgrade provides more robust user data, including the ability to view a patron’s lending history.
The “Date” field defaults to today’s date. The due date defaults to 14 days, but that loan period can also be changed. Click on the “Save” button to complete the checkout.
To check a book back in with LibraryThing, go back to the same screen, but choose the “Other” radio button and then select “Returned” from the list of options in the drop-down menu. (Figure 9)
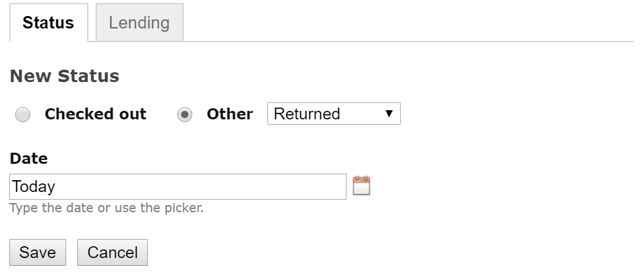
The “Date” box defaults to today’s date but can be changed. Click on the “Save” button when done.
Additional options in the “Other” drop-down menu include “Missing,” “Damaged,” and “On Hold.” I have already used the “Missing” and “Damaged” status with more frequency than I would like; we do not allow students to take books out of the language lab as LibraryThing has no mechanism for assessing fines. The “On Hold” status can be used to reserve a book for a library patron.
LibraryThing has an extensive website with detailed information about how to use it. I have also created an operations manual for the LCLRC, which I would be happy to send to anyone who wants more details about the logistical aspects of managing a library and our implementation of LibraryThing.
In summary, I would encourage you to take the plunge and organize your language lab books using LibraryThing.
Thank you for your detailed step-by-step instructions!
Do you know how to use a bar code for easy and fast check in and out of books on Librarything? Do I buy my own bar code scanner and bar code labels? If so what do you recommend?