Designing Customized Websites with Google Sites: Providing Space for Voice and Choice in the Classroom
By Macon Looper, Asheville High School

DOI: https://www.doi.org/10.69732/FIST4644
Introduction
I am a big proponent of leading a student-centered classroom where I am able to provide students with voice and choice, allowing them to take agency in their learning. This past year I started teaching the upper levels of Spanish and I knew that I wanted to find a creative and engaging way for students to practice long-form writing. I also wanted to find a way for students to build their cultural competence without me having to create each of the lessons. I decided that blogging would be a great way to provide students with a space to creatively express themselves, write in long-form, and interact with their peers. As a high school teacher, I found that most blogging sites out there are too public and my school’s privacy and internet restrictions would not allow my students to properly use them. I brought my concerns to my school IT coordinator and he suggested I check out Google Sites. I was immediately intrigued as Google Sites is a free website building tool that allows users to build and customize their own websites. As a language educator I like it because it is free, intuitive, and allows both teachers and students alike to create and customize websites to best fit their classroom needs.
| Name of tool | Google Sites |
| URL | https://sites.google.com/new?tgif=d |
| Primary use | Website building tool |
| Cost | Free |
| Ease of use | Easy to use and intuitive |
Overview of the Tool
Google Sites is part of the Google Docs editor suite and is accessed through the Google apps on the Google web browser. You can click on the 9-dot icon on the google web browser and scroll until you see the blue icon titled ‘Sites’. You can also access it by typing in Google Sites on the Google homepage and it will direct you to a link to the site. Once you have accessed the tool you can build your own website by selecting ‘Start a new site’ and you can either start with a template or build from a blank site.

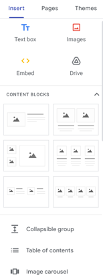
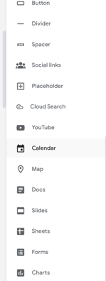
Regardless of if you choose to start from a blank site or a template, you are provided with an array of options to customize your webpage, such as embedding text, images, or links. There are also a variety of layouts to choose from, allowing the user to arrange the words and images in a way that best highlights their content. Additionally, you can embed resources from other Google platforms such as Google Docs, Sheets, or Forms. All of these tools allow you to fully customize your website without having to know a single line of code.
|
|
|
Once you are finished, you publish your site by clicking the word “Publish” at the top right. To share the final product, you can copy and paste the website link to share. Similar to other Google applications, you can also share it by clicking the icon with a person and plus symbol and directly sharing the link with someone’s email. You can also invite others to edit and collaborate on the site with you.

The site is completely free with no subscriptions or hidden costs. Google Sites are owned and managed by Google and have a lot of similarities in features to other applications such as Google Slides or Google Docs; this can be an advantage as many students are already familiar with navigating and using these popular features of Google Suites. Even though I do not have previous experience with website building, I find this tool is very simple to use and easy to navigate and personalize.
Practical Uses for the Language Classroom
While this tool was designed with small businesses in mind, I have also found it to be a great tool to use in the language classroom. So far, I have only used it for my students to create blogs, but it would also be a great tool for teachers to create their own classroom websites.
Blogging in the Classroom
Blogging is a great way for students to take agency over their learning, to investigate and to improve their presentational language skills in an authentic and personalized way. This past semester I incorporated blogging into my classroom for the first time in a High School Spanish 4 honors class. Over the course of the fall semester my students created 6 different blog posts based on a specific topic with detailed guidelines provided. At the start of the semester, my students picked a Spanish-speaking country to focus on throughout the semester. The 6 blogs they created were titled:
1. Public spaces for socializing
2. An author and their notable works
3. A musician or musical group
4. Forms of entertainment
5. Life and death
6. A December holiday
The guidelines varied slightly depending on the specific topic, but the primary objective for each was for students to explore the topic in their chosen Spanish-speaking country and share their research by introducing the topic, describing it in detail, making a comparison with their own community, providing their personal opinion, and finishing with a conclusion.
Students also were required to include images or videos to enhance the learning experience and to include the sources where they found their information. Once students completed and published their blogs, I had them post their blogs onto a class Padlet where they could read and learn from each other’s blogs and leave constructive comments for their classmates. Due to privacy policies at my school, students were not able to publish their blogs on official blogging sites; but with Google Sites, they were able to create unique blogs with ease and learn about other countries via the Padlet link. This assignment is best suited for students taking advanced language courses. I used it in a high school classroom but it could be adapted for use at the middle school or university level.

Implementation of Blogging in My Classroom
Below I have included pictures of one of my students’ week 4 blog posts on ‘Forms of entertainment’ with their permission. The objective for this post was for students to create a blog that explores 2-3 popular pastimes in their chosen country and compare them to pastimes in their own community. The adapted ACTFL can-do statements for this assignment were:
- I can create a blog entry exploring 2-3 popular hobbies in my chosen country, detailing their history and cultural significance.
- I can effectively compare these hobbies with recreational activities in my community, highlighting cultural differences and similarities.
- I can enhance the blog with multimedia elements, such as images or videos, showcasing the chosen hobbies in both countries.
- I can provide insightful cultural analysis, drawing conclusions from the comparison of hobbies and addressing the significance of these hobbies.
- I can present the information in a creative and engaging manner, incorporating personal touches and visual elements that enhance the content.


Overall, for a first attempt at blogging, I feel this went very well. This was also my first time teaching Spanish 4 and I found the blogs to be a great way for students to have creative agency in their learning and to build up cultural awareness as they prepare for AP Spanish language and culture courses in the spring. A downside of doing longer writing assignments online is that there is a higher chance of students using online translators or AI to generate their responses, and it is more difficult to provide detailed feedback than it is for paper assignments. Since I was building the curriculum as I went, there are some tweaks that I would make to future assignments.
For one, I would allow 2 weeks for each submission. I did this for the last blog submission and it worked well. At the end of the first week working on the final blog, students had a peer editing day where they worked individually with an assigned partner to read and provide constructive feedback on the blog post. At the end of the second week, students were responsible for orally presenting the information without notes to a small group before publishing the page to Padlet. This made sure that by the time they posted their published blog, they had a deeper understanding of what they learned. It also helped hold them accountable for using their own words rather than using Google Translate or AI. I would also like to do some further investigating for ways for students to interact with and comment on the sites. For a first attempt, I think that Padlet was great and served its purpose, but I am also curious to see what other tools are out there or if there is a way to comment via Google Sites. Overall, students enjoyed getting to create their own webpages and preferred writing on the blogs to journaling or writing an essay. The majority of them would agree that having a little bit more time for each blog post would be helpful. I will absolutely use this tool again in the classroom and am excited to make tweaks to it and to see how the assignments morph as I teach the course longer.
Teacher Websites
Another way that teachers can productively use Google Sites is for a teacher website. A personalized website for teachers has many benefits in the classroom as it can become a central place to find all sorts of classroom tools such as: additional resources, classroom links, learning materials, weekly newsletters, games, and songs. Teachers can also use it for communication with students and families, and can use it to highlight student work, school events, or current events. Google Sites is a great tool for building these web pages as it is free and easy to use, thus removing barriers to entry for teachers. Most teachers have class pages on sites like Canvas, Google classroom or Moodle, but they are not necessarily viewed by students as engaging, nor are they a place that students gravitate to for self-directed learning. Having a personalized website allows a teacher to curate the space with engaging tools and resources specific to the class and that might appeal more to student interests. It also allows for teachers to display their own creativity and customize their classroom.
While there are many ways for a teacher to use a website in the classroom, a specific use could be for choice board enrichment tasks or homework. For example; a student may choose to complete a few language-related games, or a song or video activity; or they may choose to read a current event article and write a reflection on it. This sort of task might be best suited for a high school or college language course; however, a variation could be implemented at the middle and elementary level. Our students often experience information overload, so having a centralized hub for all things class related can help guide students who are seeking additional practice. Some learning objectives for having a class website include:
- I can take agency over my learning and use provided resources to learn more about something that interests me.
- I can identify areas where I need to improve and can complete an activity that will help me achieve my learning goals.
- I can use 21st century skills to stay up to date on class, school and current events.
Conclusion
In conclusion, Google Sites is a great and easy way to allow students to express themselves in writing through blogs, or to create a teacher website that can help with class management as well as allow students to continue their learning beyond the classroom.


Thanks for sharing your experience and applications of Google Sites for Edu. I’m glad students, educators and even administrators are making full use of this underutilized tool.